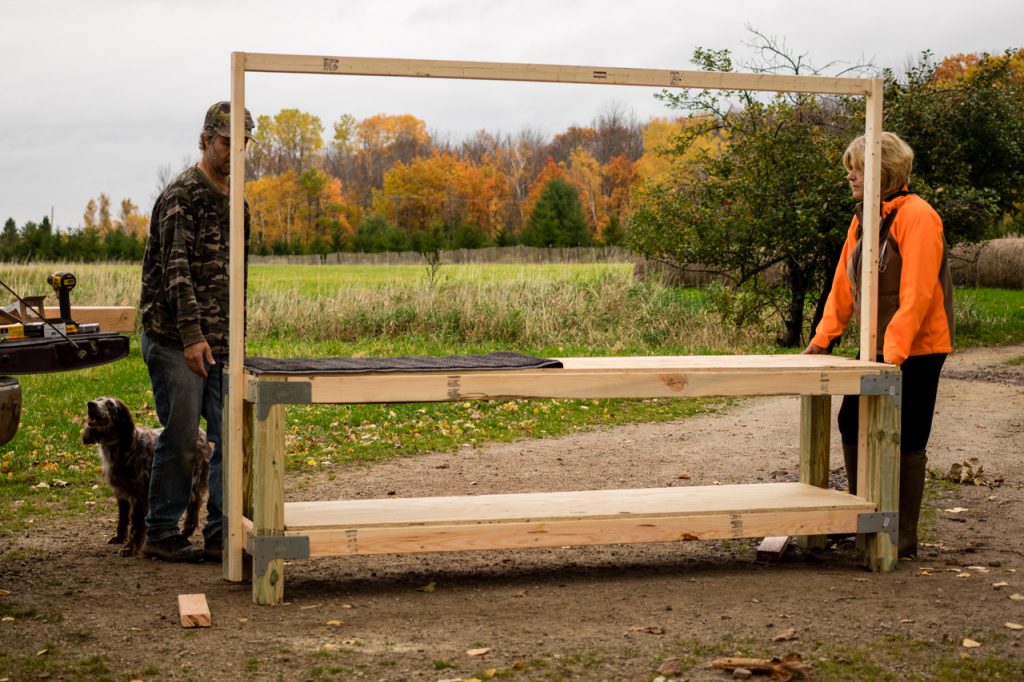
How to Build A Heavy Duty Dog Training/Grooming Table Step-by-Step

My mission is to help you have a healthier dog and breeders to raise healthier Llewellin Setters puppies through educational content based on over twenty years raising, training, and breeding Llewellin Setters. To help support these efforts, this page may contain affiliate links. I may earn a small commission for qualifying purchases at no cost to you.

The completed grooming/training table

Here we show you how we built our own heavy-duty dog grooming/training table and how to do it yourself.

Timelapse Video of Us Building the Grooming/Training Table. 


Training/Grooming Table Materials List

  • (1) 4×8′ sheet of 3/4″ plywood
  • (9) 2×4×8’s
  • (1) 4x4x12’ #2 Pressure-Treated Timber
  • (8) Simpson rigid tie connectors (see below). We used 18-Gauge 2X Rigid Tie Connector
  • (200 count) #8 x 1-1/4″ screws
  • (4 count) 3″ screws (see below)
  • (1) tube of heavy-duty construction adhesive
  • (2-4) eyebolts
  • (4) 3″ locking casters (150 lb.+ rating per caster recommended)

Download the Materials List PDF to take shopping!

[convertkit form=703768]


Plywood: We used just RTD Sheathing Plywood, but I would have rather used cabinet grade 3/4″ plywood for the sanded, splinter-free surface. I will be painting ours with paint to which sand is added for a non-slip surface and to prevent splinters for the dogs. You could also add a mat, carpeting, etc.

Simpson Tie

Click for larger view

Simpson Strong Tie Rigid Tie Connector

Click for larger view

Simpson Ties: Simpson ties are usually found in the metal building brackets rack. These connectors are used to secure two wood members (forming a 90° corner) to a vertical post. If that sounds confusing, just imagine three 2×4’s intersecting to form a corner.

Screws: Make sure the screws you select have a large, flat head that will sit tightly against the Simpson ties without going through the pre-drilled holes. These Simpson ties are designed for #8 screws, which were sold in a rack right next to the ties.

Tools:

  • Drill/driver
  • Impact driver (if not available, a drill/driver will suffice)
  • Miter saw (preferable for cutting 2x4s, although a hand saw or circular saw would also work)
  • Jigsaw (or a hand saw)

Download the Materials List PDF to take shopping!

[convertkit form=703768]

Design Overview

The plan for this table was adapted from a workbench design found here. It uses a reinforced frame of 2×4’s with a lower and upper plywood shelf. We built a table with a shelf measuring 2′ wide x 8′ long x 30″ tall. You can, of course, adapt this to your needs. You might not need an 8’ long table if you are using it for just grooming. Trainers that use the table for force-fetch training may like a 16’ long table or 2, 8’ tables.

Height is a personal choice.  We made ours 30″ high and like this height for grooming our dogs.

We adapted the original plan for the legs and used 4×4” timbers and added supports and an overhead bar for attaching a lead to hold the dogs still and standing while we groom.

The original plan also calls for casters. As you can see here, we did not use them, but are going to add them. This will be very nice if one person needs to move the table.

Project Cost: Around $130 (This was built in October 2016) (Note: If you add the casters, this will add $30-40 to the project cost)

Step 1: Cut the Lumber to Length

We cut the plywood sheet in half lengthwise, creating two 2′ x 8′ pieces. Almost all of the remaining cuts involve trimming 2×4’s to the appropriate length.

Here are the 2×4 lengths you’ll need:

  • (5) 93″ for the lengthwise supports
  • (4) 17″ for the width-wise supports
  • (2) 24″ for the caster supports (if you use them)
  • (2) 67″ for the side supports for the overhead (your lengths might be different and you might want to wait to cut these until you’ve fully assembled your table. We attached ours to the bottom shelf and our shelf is set at 10” from the ground (I would change this to make it higher to leave more room under the table for storage of larger items).

Our 4x4x12’ Timber Cuts:

  • (4) 30″ for the legs (you may want yours longer or shorter, depending on the table height you desire)

Step 2: Build the Table Frame

Attaching the Simpson Rigid Tie Connectors


To start assembling the frame, we began with the table’s top (rather than the shelf). Placing a Simpson tie at each corner, we used an impact driver to put in the screws. If you find the 2×4’s are bowed, put them in crown-side up (meaning, arched down). It’s helpful to use a scrap piece of 2×4 to ensure that adjacent pieces line up at the same height.


Check the alignment
Check the alignment

You can see in the picture above that the table legs come all the way up even with the top of the adjacent 2×4 supports. This is important. If they are not aligned, your dimensions will be wrong, and the corners will be weaker.


Begin assembling the base

Begin assembling the base of your table.


Use a scrap piece of 2×4 to nudge things as necessary


Attach the top of the table.

Attach the top to the table with screws approximately every 20″ or so. Be sure to countersink the screws so nothing catches on them.


Step 3: Build the Shelf Frame


Build the Shelf Frame

We constructed the shelf in a very similar fashion using Simpson ties at all four corners. We flipped the table upside-down to slide the ties on, and then positioned them 7″ up the leg. The location is flexible, but they all should be kept consistent.


Adding the 2x4s for the shelf frame

We flipped the table right side up and added the 2x4s for the shelf frame. Maddie assisted. 🙂


Finish the shelf frame. Let your Llewellin Setter test the table!
Finishing the shelf frame.

Finish the shelf frame. Let your Llewellin Setter test the table!


Step 4: Cut the Shelf Corners

Cut the Shelf Corners

The plywood shelf needs to have notches cut from each corner to account for the table legs. Grab a scrap piece of 2×4 (or the 4×4 post, as we used) and trace the outline, being careful to orient it correctly. Use a jigsaw to cut them out.

Step 5: Screw Down the Plywood


Screw Down the Plywood

Slide the shelf in place and put screws around the perimeter every 20″ or so. Countersink the screws below the surface to prevent things getting snagged on them. Do the same for the top. You may find that you’ll need to wrack the frame a bit to keep everything square and all the edges lined up.

Step 6: Add the Overhead


Add the Overhead
Add the Overhead

Decide on the height of your overhead piece. The total length of our side supports is 67″, with the height above the table 43″. We attached the bottom of the side supports to the shelf. A sturdier option would be to make cut outs in the top of the table to slip the supports through. We don’t have the proper saw to do that so we just attached ours to the side.


Add the overhead step 2
Adding the Overhead

We then attached a board between the two supports onto which we attach eye bolts to hold the leads to hold the dog in place. Another option would be to use pipe or a cable.


The completed Training/Grooming Table
The completed Training/Grooming Table!

All done except for a few finishing touches.

Step 7: Finishing Touches

Some ideas for finishing your table:

  • Add casters for easy moving
  • Paint the table top with a paint/sand mixture for easy traction.
  • Add carpeting or a rubber mat for comfort/traction.
  • Add ramps so the dog can get up and/or down themselves.
  • Attach a power strip and have the table double as a charging station or for easy access to plug in grooming clippers or a Dremel tool.
  • Attach hooks to hang brushes/combs, etc. (See the grooming tools I use and recommend!)


The dog grooming table in use
The dog grooming table in use!


Uses for your table:

  • Use the table daily from the first day you bring pup home. This gets them used to being on the table and will help with veterinarian appointments.
  • Use the table for grooming, nail trimming, ear cleaning, etc.
  • Use the table to introduce the sit & stay command, etc.
  • Place the table by the front door and use to clean off pup’s feet, check for ticks, etc., before entering the house or to dust with DE before heading out on a hunt.
  • Dogs love the table!

Purchase the PDF:  DIY – Heavy-Duty Training/Grooming Table


Purchase DIY Heavy Duty Grooming/Training Table

You can purchase the PDF Version of this post. This way, you can have the photos and instructions on your phone or other device for reference while building it and not worry about referring to this post the entire time (saving on data) or if you do not have data service in your garage, etc. Get it here.


I hope you’ve enjoyed this post. I absolutely love our table. 

Note: This was photographed/produced in October 2016, but I just found it and got around to completing the post.

If you build one, share your photos and experiences!

All the best,

M.